![]()
|
|
|||
|
|
|||
|
|||
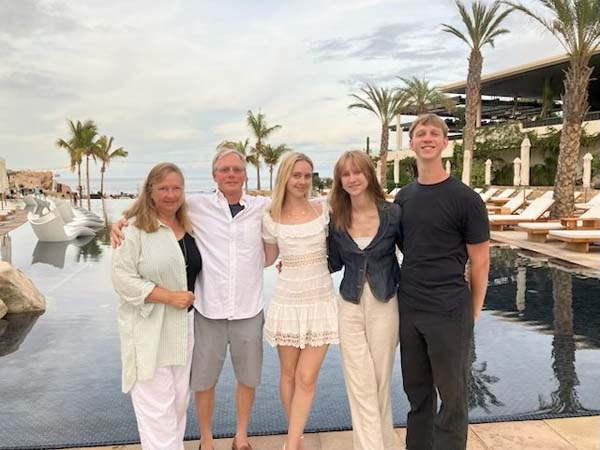
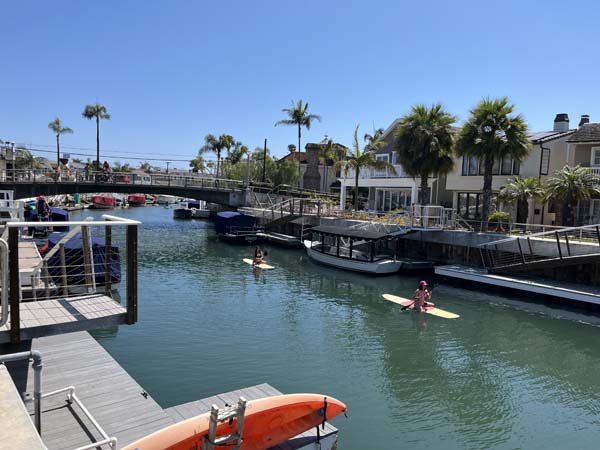
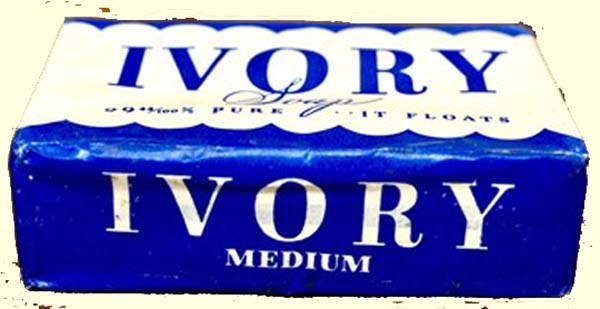
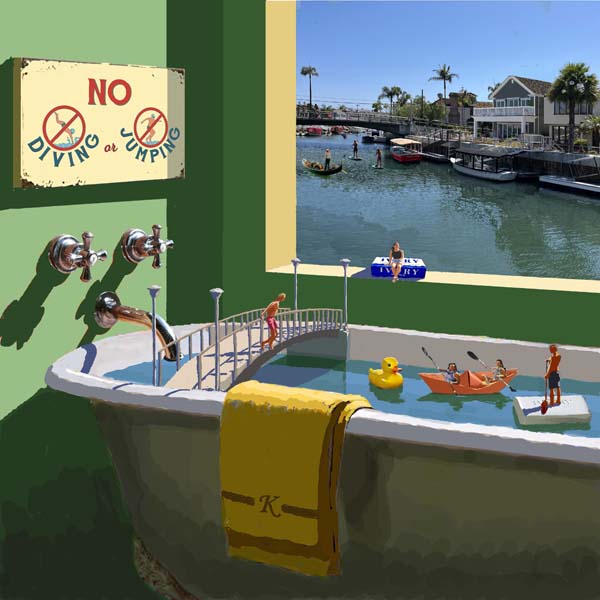
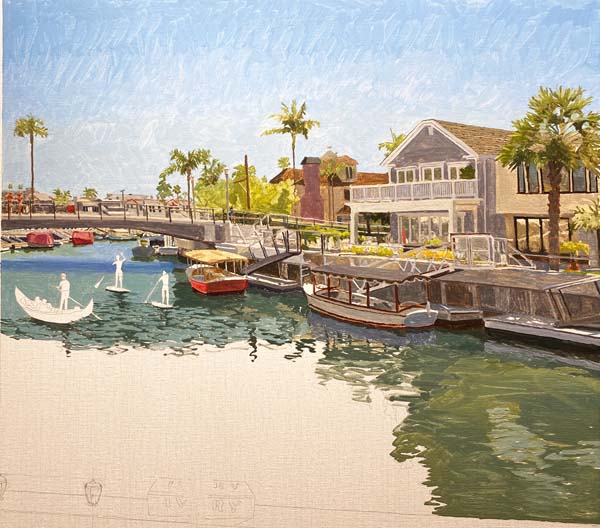
 The photography session went great. We had a typical sunny California day. Here is Allison. She will be the rear kyacker in the origami boat. 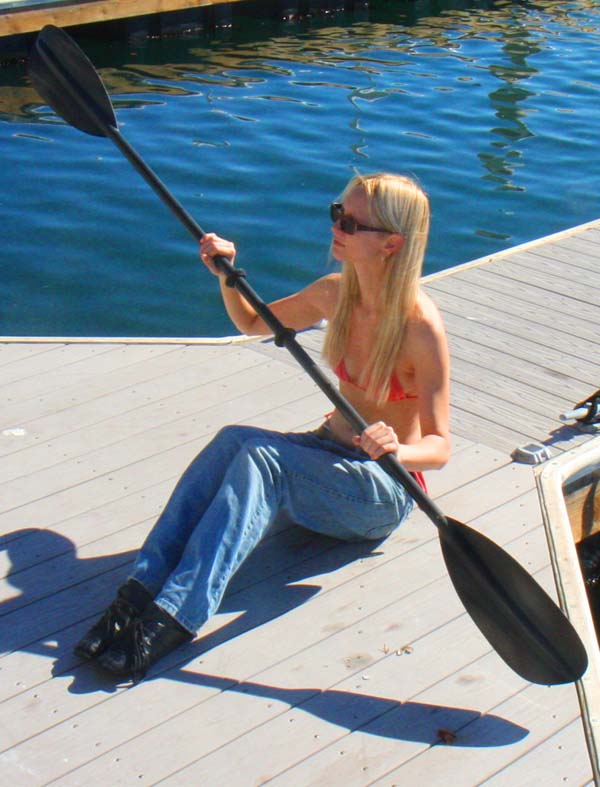 Fiona is the forward kyacker in the origami boat. Both sisters will be looking up at dad on the bridge. 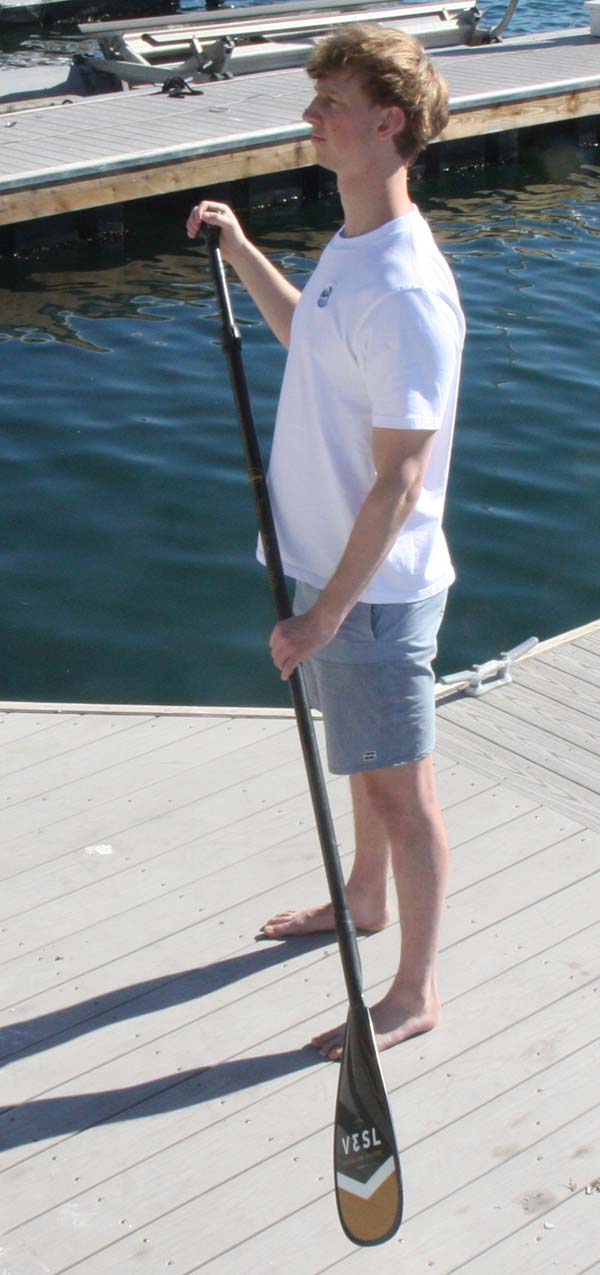 Here's Kevin. He'll be stand up paddleboarding on the bar of Ivory soap. 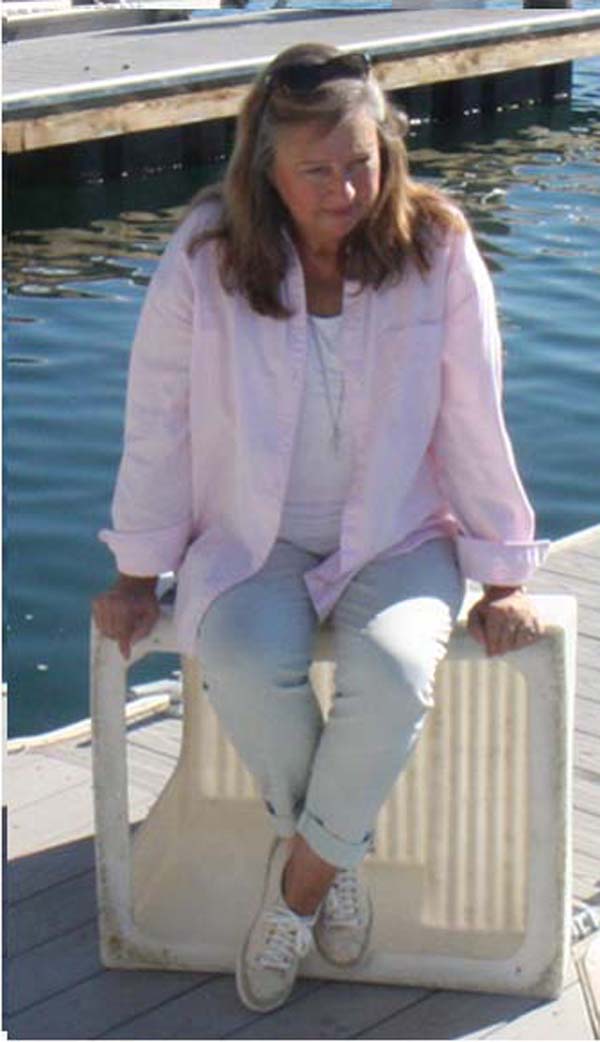 Mom, MaryBeth, will be looking down at 'the kids' from a safer vantage point on the window sill.  And finally, Steve, dad, the 'Jumper,' freezes his position for the camera.  I made this Ivory soap bar package from a photo of a vintage 1940's Ivory soap wrapper. It has a much more attractive design than its contemporary.  One of the details of the Naples canal bridges are the four street lights that frame the bridge entries. As the early 1900's lights went out of stock when they were broken, they were replaced by more modern versions. There are a few of the originals left and I thought they looked way cooler than the newer lights. So, I am putting the vintage lamps in the painting.  Here's a photo of my 'rubber duck' that I'll paint from. He looks so happy to be in the painting!  I've sketched in all the figures. Their heads are about 1/2" high, so there won't be a lot of detail rendered on faces, but the family will still be able to recognize each one. Because the figures are drawn in, I can now paint a few large areas of the painting. Here you can see the green of the wall that surrounds the window was painted, revealing the outline of dad on the bridge and the railing. The lower left water area of the scene outside the window has been finished, allowing me to carve around mom and the bar of soap.  The warm color of the towel is very important to the color balance of the image. There are a lot of cool colors and this towel does a large job of warming up this area.  I've gone into the tub and painted the water and reflections, further delineating the detail of the bridge railings.  The bridge and the top edge of the tub has been rendered. I still have to address the glass globes on the street lights. Getting closer to rendering the figures, which is always a tough task. I'll finish all the inanimate objects first, leaving the soap, soap box, rubber duck and the origami boat. 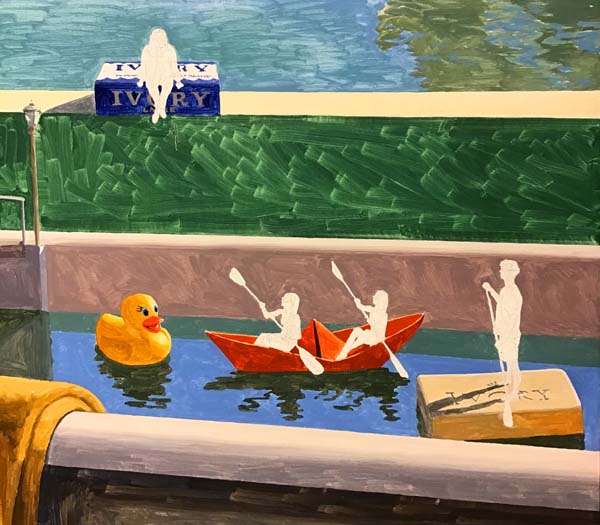 The bar of soap, the soap box on the window sill, the rubber duck and the origami boat have all received their preliminary coat of oil pigment and now the painting is ready for the human element to be painted. 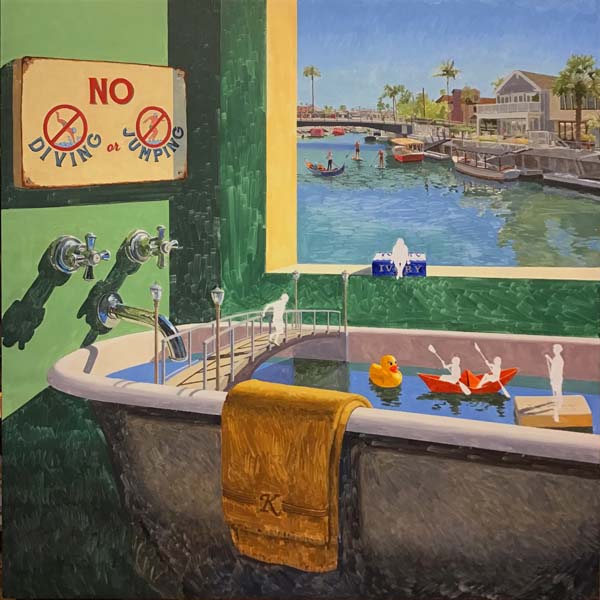 Here is the entire canvas. You can see the five figures 'ghost' silhouettes, all in white on the canvas. I'll be devoting at least one complete day to each figure. 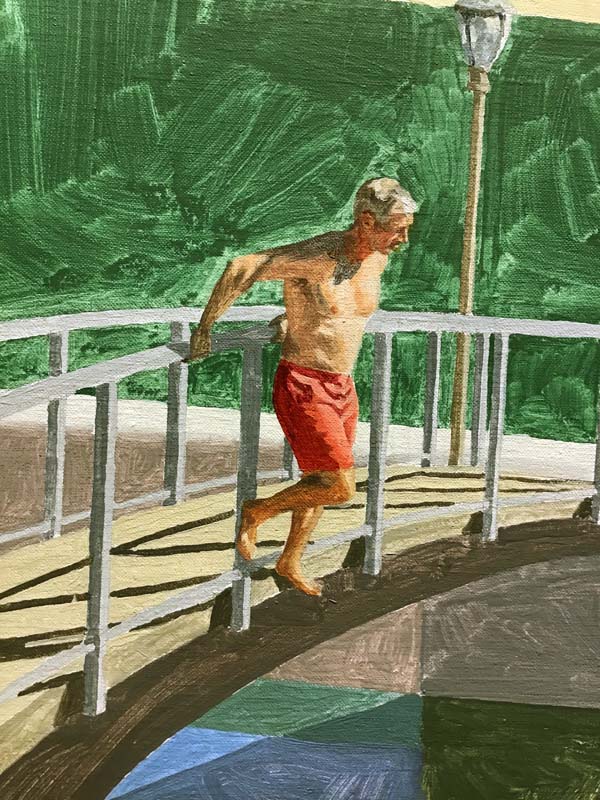
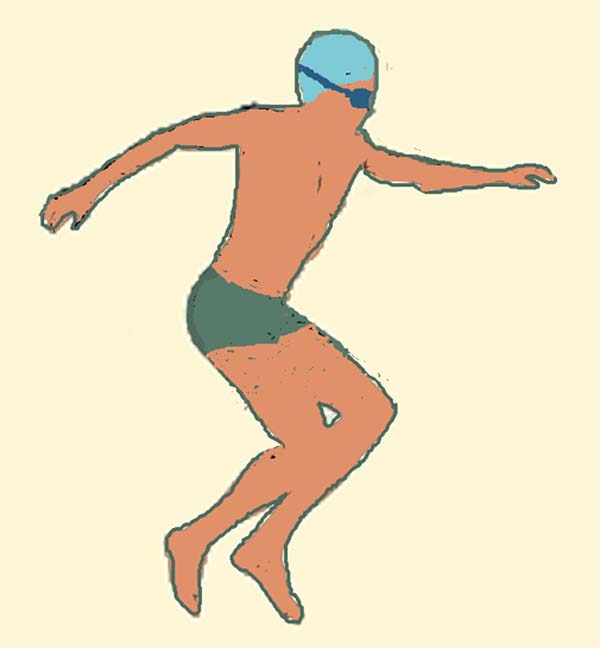
Here is the first figure, Steve. His red swim trunks were needed to bring a compliment to all the green and blue that surrounds him. 
MaryBeth is now painted in with the preliminary layer of thin oil. 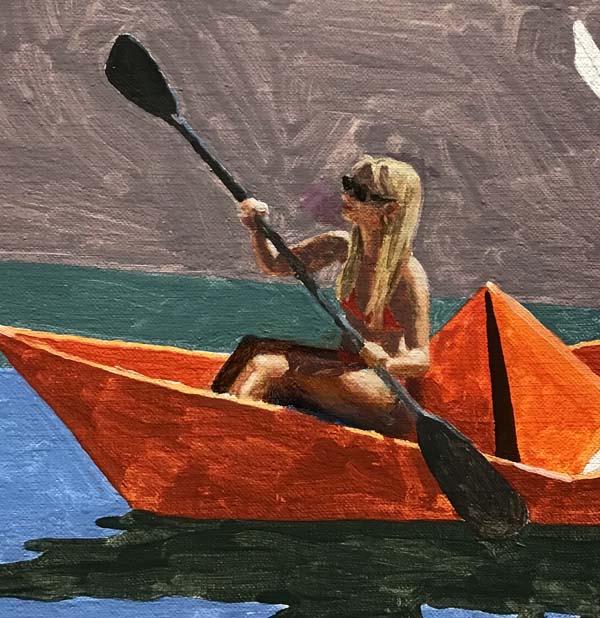
Fiona is painted. Now on to Allison. 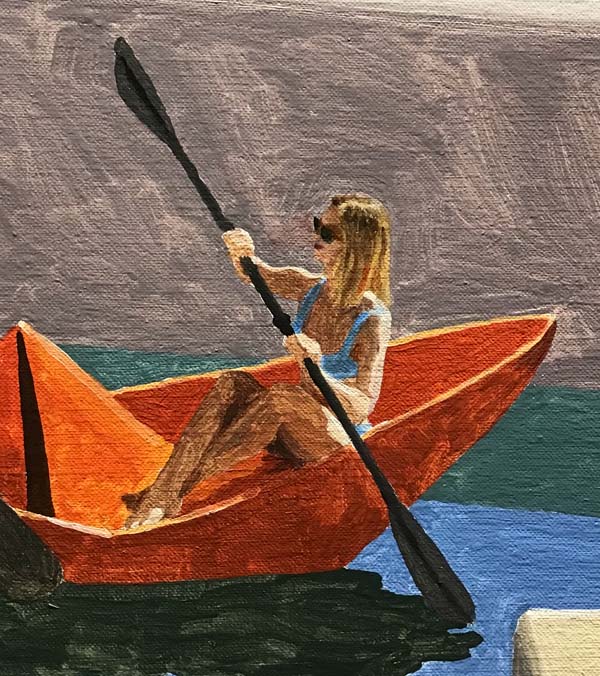 Allison is sketched onto the canvas. 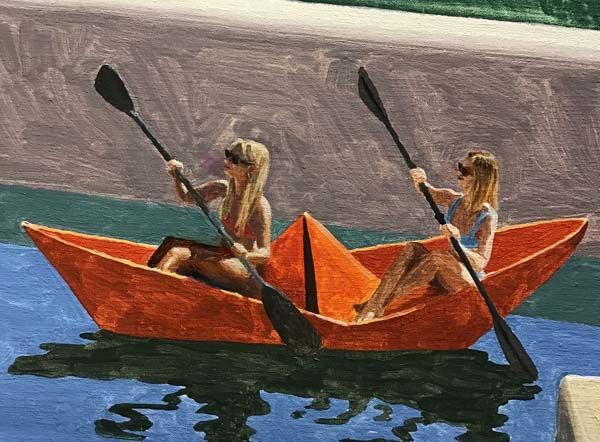 Here is a photo of the two sisters in this first stage of painting.  Kevin is the final element to bring the painting to its half-way point. 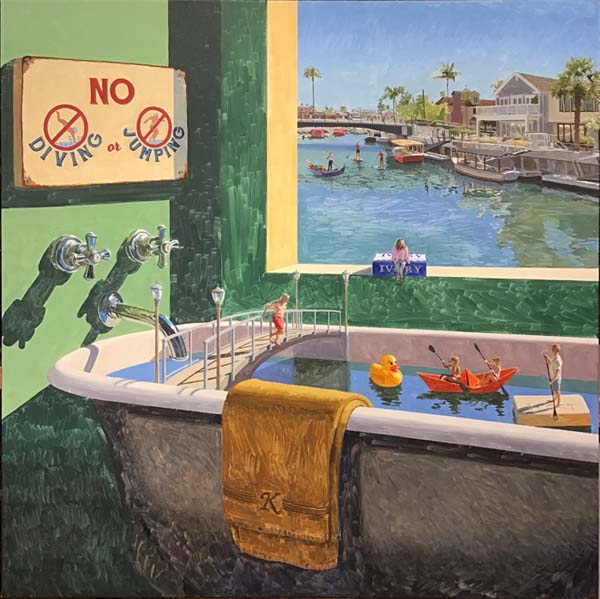 Everything on the canvas has received one layer of preliminary paint. Now I will assess all the values and hues of every object and area and make the necessary adjustments. This final stage will be painted with tube-thick oil paint. 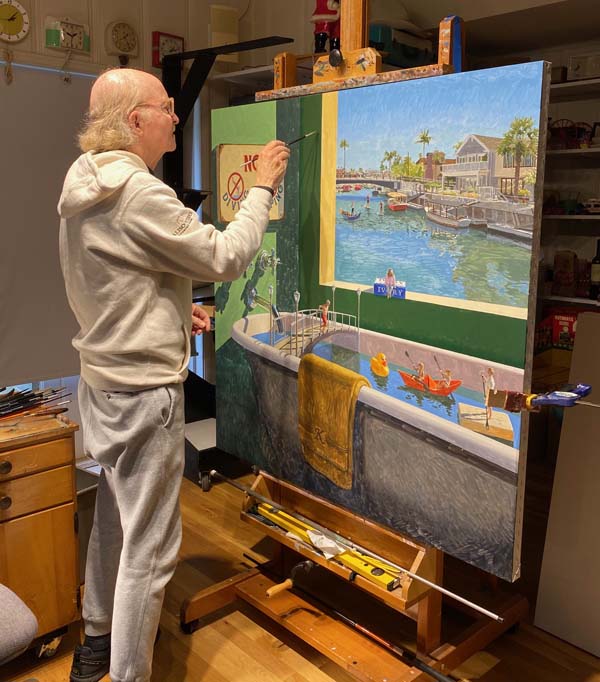
I'm applying the first passage of 'final' paint. It is not thinned down like all the previous applications on the canvas. I've decided to paint the back wall first, which will help me determine how dark or light to make the values of all the objects that it touches. 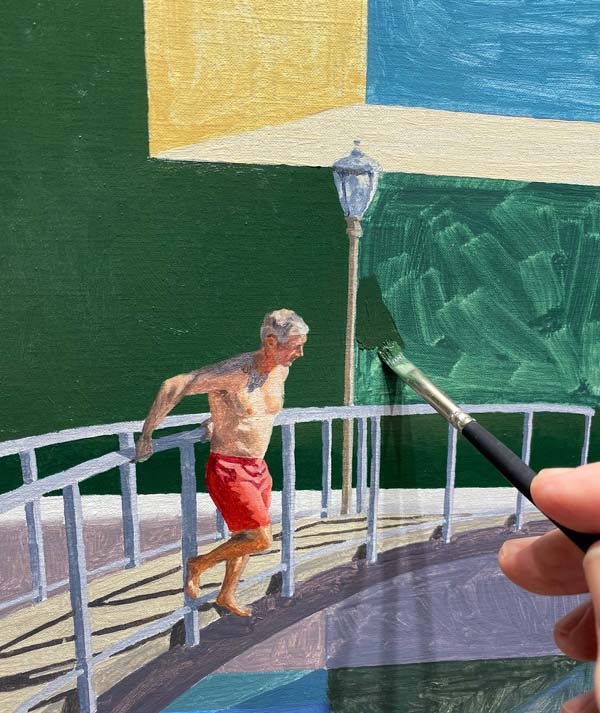
This close-up shows the difference in the first and final layers of paint, the latter being much darker and warmer. I'm using a natural bristle bright brush. 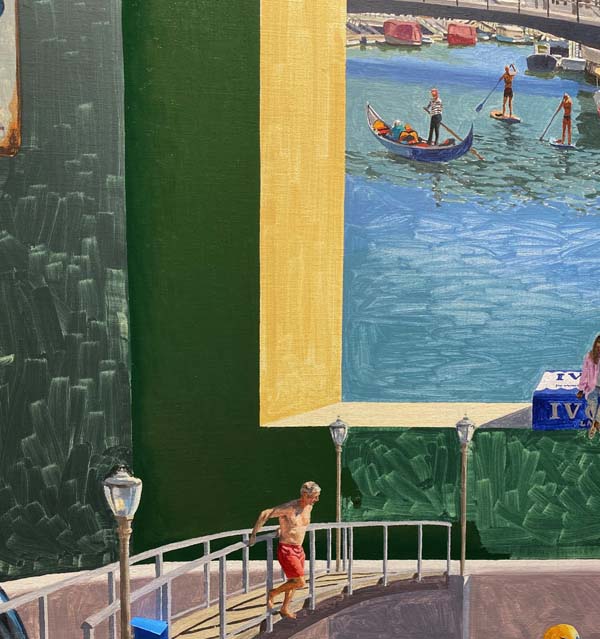
Here is a look at a larger section of the back wall. 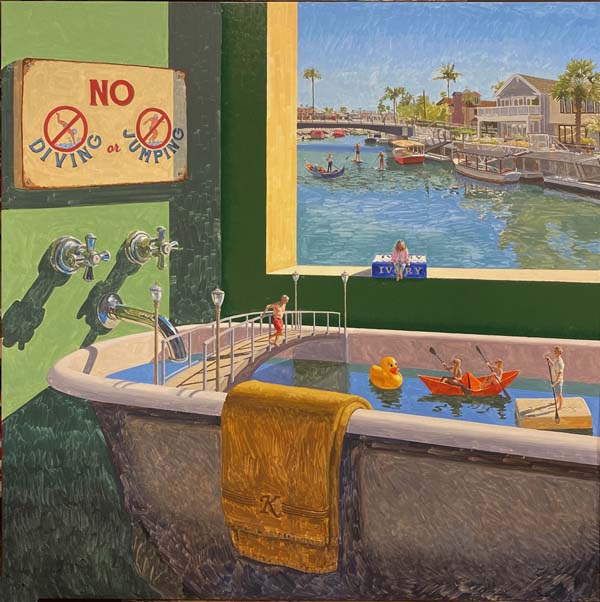
And now a look at the entire finished back wall. Notice how I went beyond the original sketch and added a darker green value in the corner where the wall meets the other wall and also the dark addition along the top edge of the bathtub. This helps give the feeling of distance between the tub and the wall, telling the viewer that the tub is blocking the reflected light that is bouncing up onto the wall. 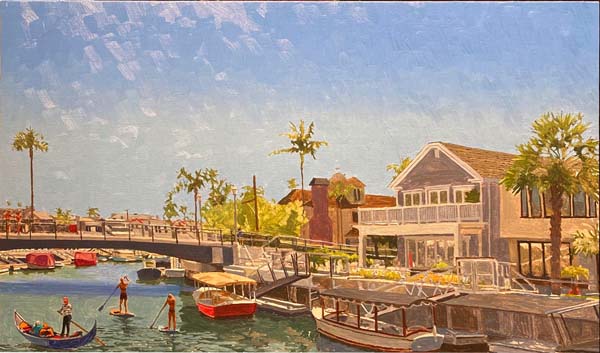
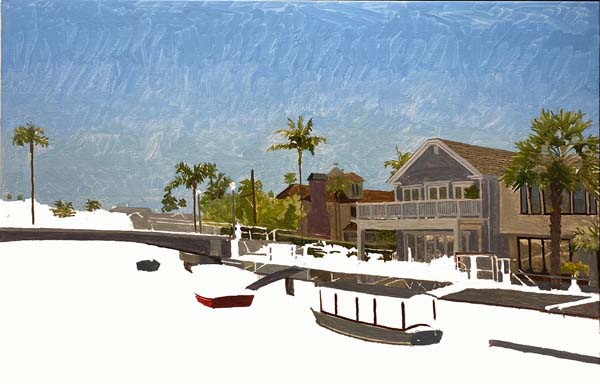
I've moved out into the window scene and painted the sky. 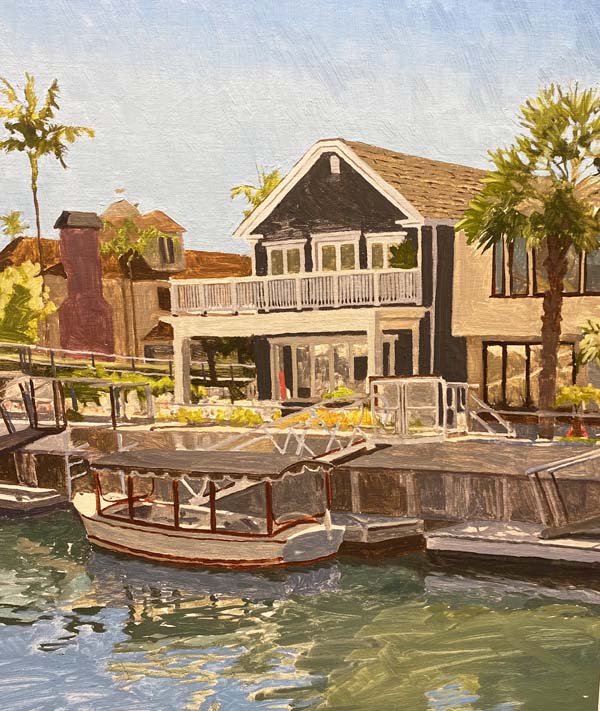
Continuing with the scene outside the window, I've darkened the gray house significantly, making it look out of place at this point. Now, I'll darken everything surrounding it to make it appear lighter and to make the outside scene a richer image. 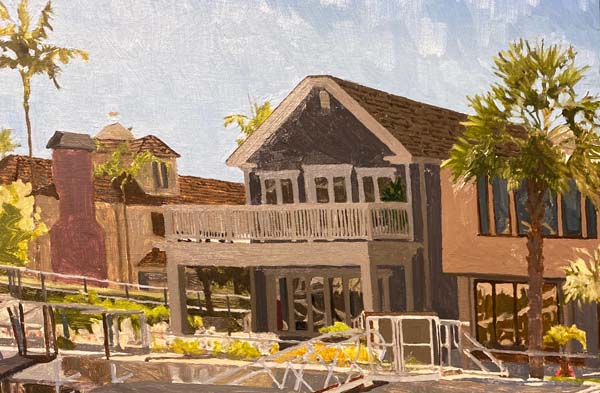
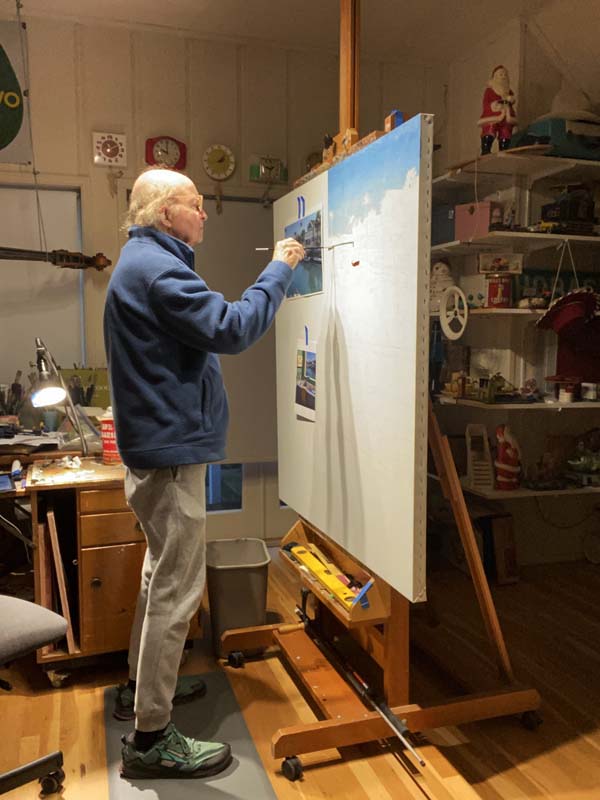
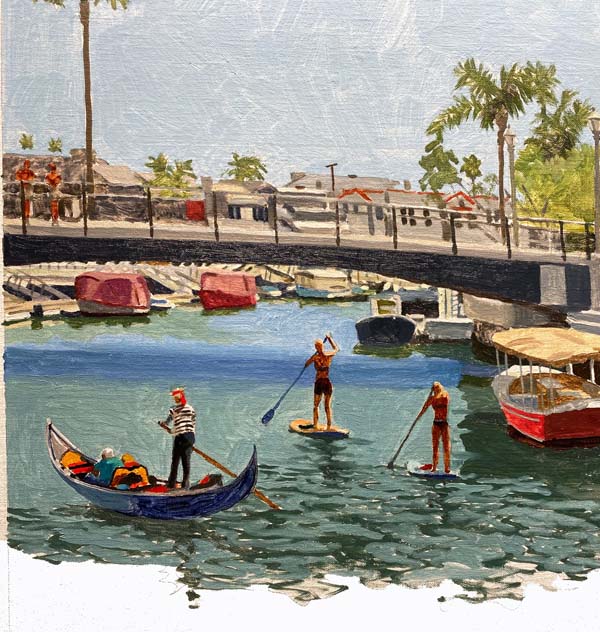
All of the white trim, railing etc. is now a darker gray as well as the house next door had been darkened. I'll continue throughout the entire scene until everything has a final layer of thick paint. Here's a short video in my studio this morning. 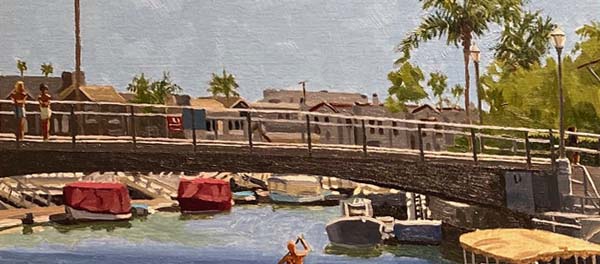 The Holidays slowed me down for a bit but I am now back onto the painting, working on the canal scene out the window. I've completed the background houses, bridge, the dock area in the distance and the two people on the bridge.  The homes in the foreground are done, along with the maze of railings and the seawall. I'll go into the water, the Duffys and the people in the canal next. 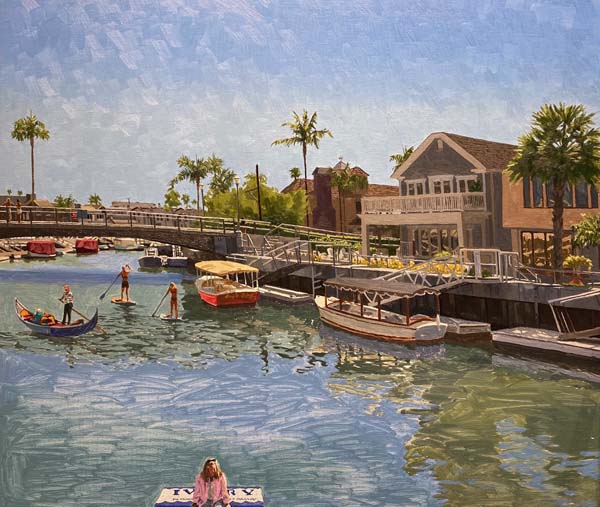 Here is a photo of the entire window. All the brush strokes from the first layer of thinned oil will disappear as the thicker oil gets blended into the water. 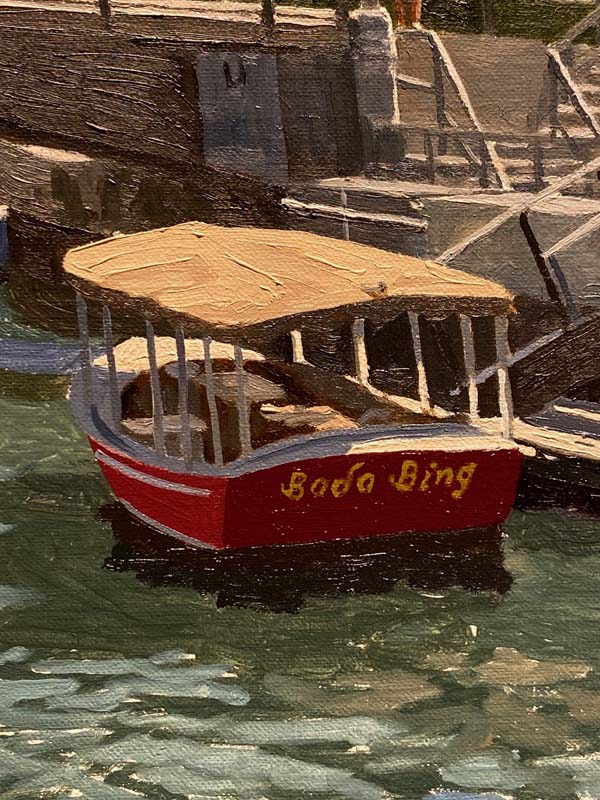 "Bada Bing" received its final 'paint job' today.  As well as this other Duffy. 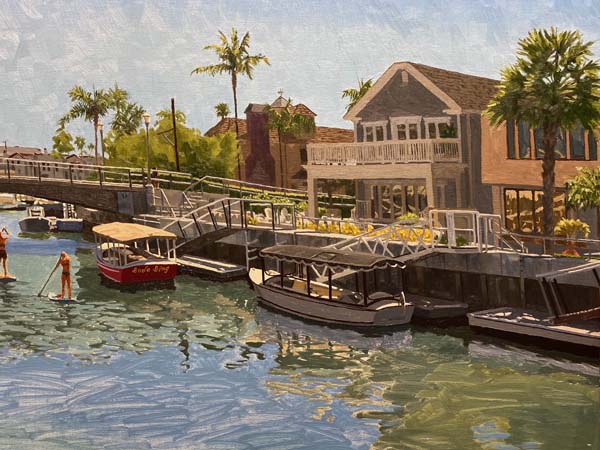 Here's an overall photo of the Duffys and the docks. 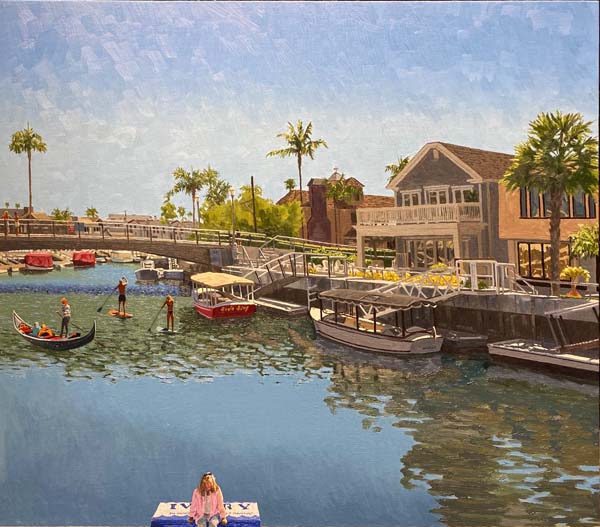 The scene outside the window is completely finished. This area of the painting was very time intensive, capturing the detail and the beauty of the canal. 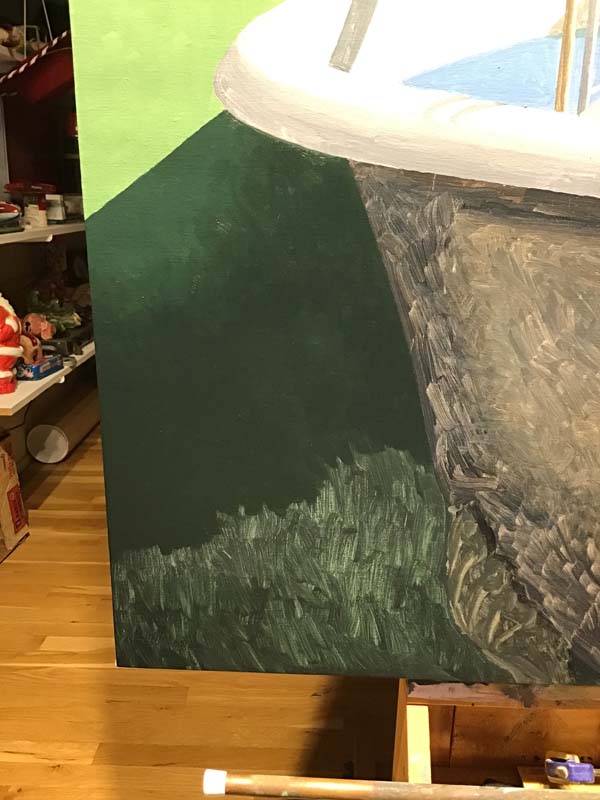
I've taken a photo of the lower left portion of the canvas, showing the final layer of green paint I'm applying for the shadow on the wall, cast by the bathtub. You can see how drastically darker this paint passage is. I mixed three values of the green, blending them from lighter to darker as I get closer to the floor. 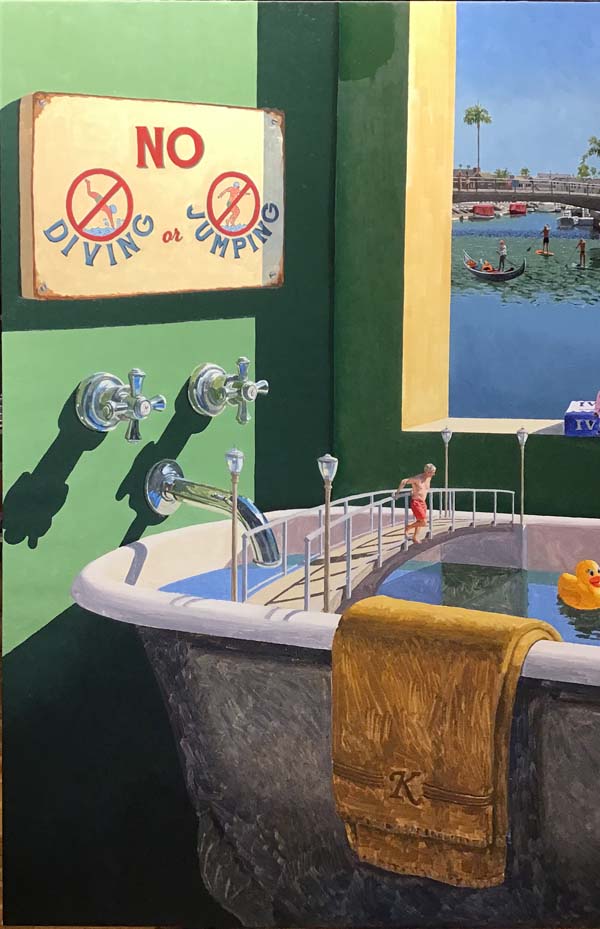
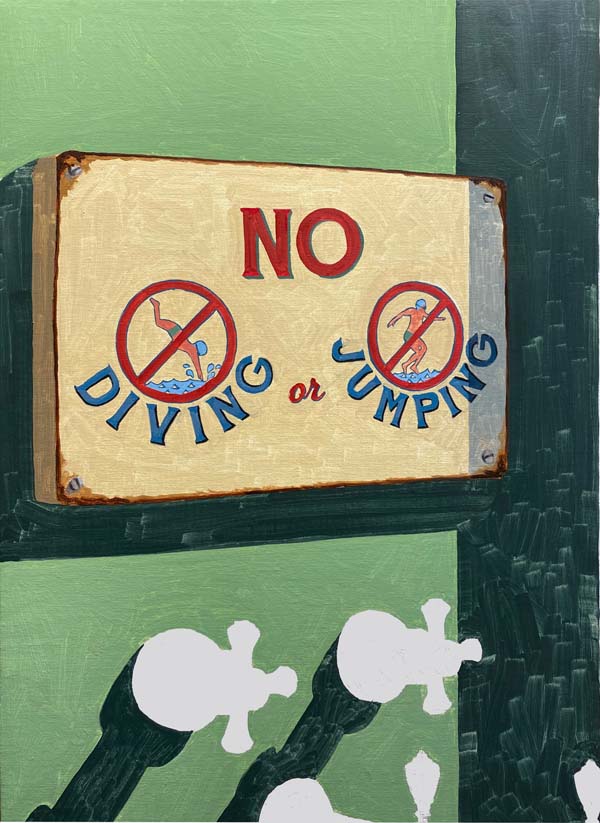
Here is the left side of the canvas. You can see the deep shadow cast by the front wall, the 'no diving or jumping sign,' the faucet and the tub. I also blended a small dark value of the green in the corner where the walls meet to emphasize the depth. 
The largest paint passage is the exterior of the bathtub. I mixed 3 values of gray/black and have begun to apply them. You can see two of the values in this photo. They are very dark compared to the first layer. By getting the outside of the tub real dark, it provides a visual 'stage' for the main focus of the painting... the family in and around the tub. 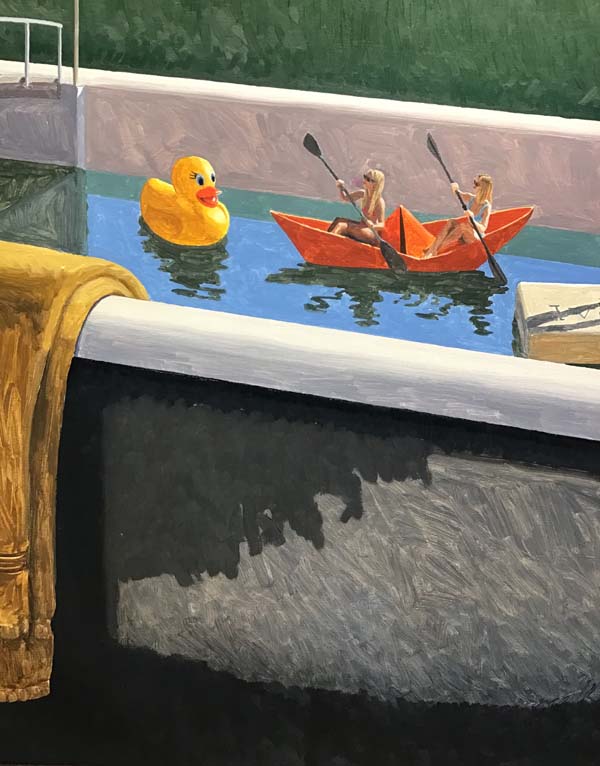
This photo shows the right side of the tub. As with the left side photo, the values are not blended yet. 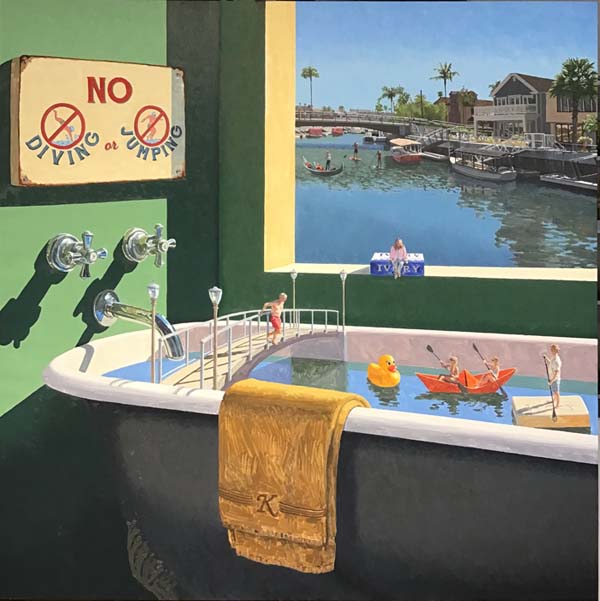
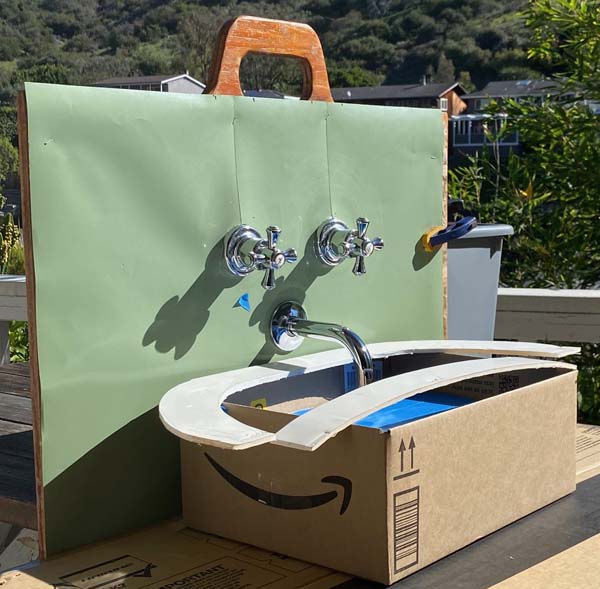
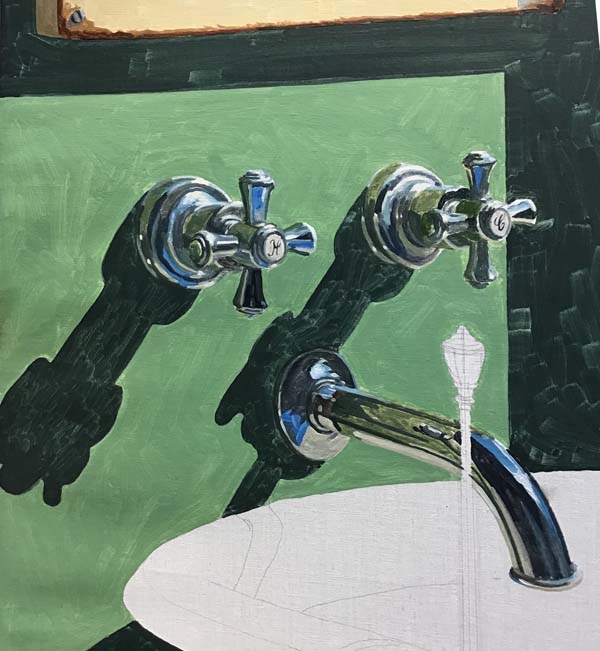
Here's a look at the entire painting, showing the finished exterior of the tub. Notice how the top and inside of the tub 'lights up.' The big difference in the values of the dark grays on the exterior iron on the tub, compared to the light struck top edge of the tub is very dramatic. 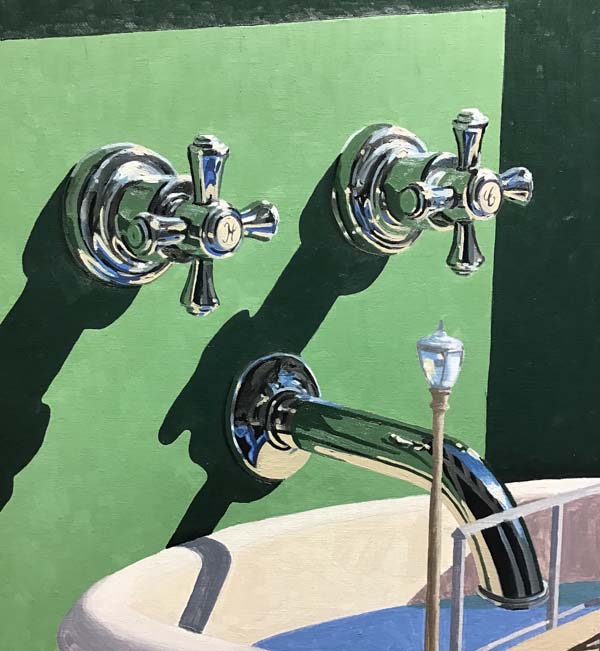 The faucet handles and spout are done. There were many corrections to the preliminary paint layer, mostly with values.  Another element of the painting is complete. I've been blessed with a steady hand my whole life, which helps when rendering type and very thin cast shadows and outlines. 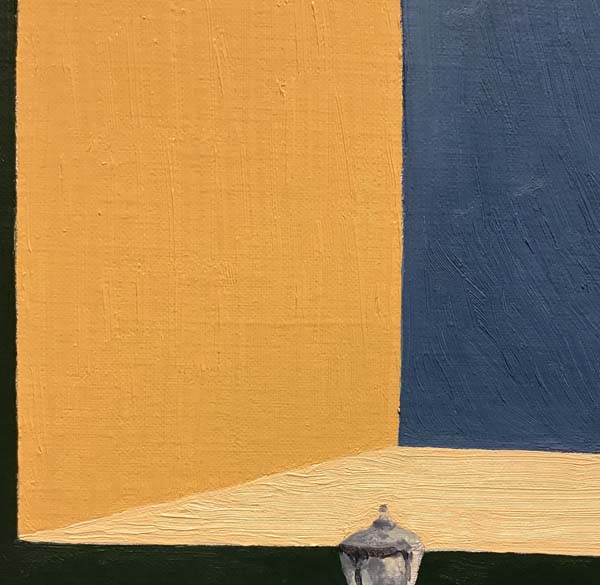 I've painted the window sill, both the vertical and horizontal sections. If you look closely, you can see the thick application of paint on the lower sill. 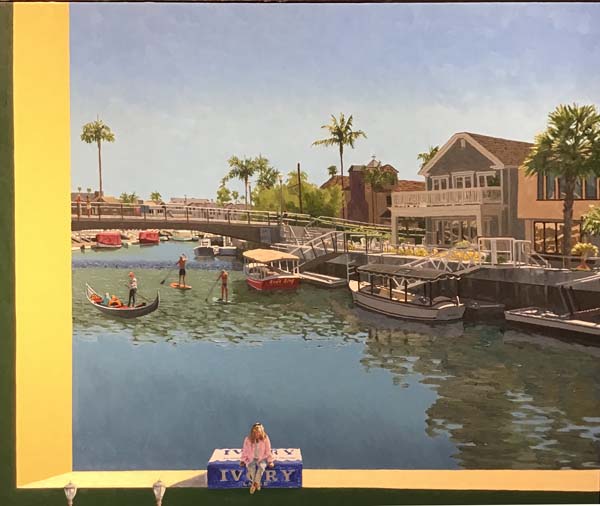 This shows the entire window sill. 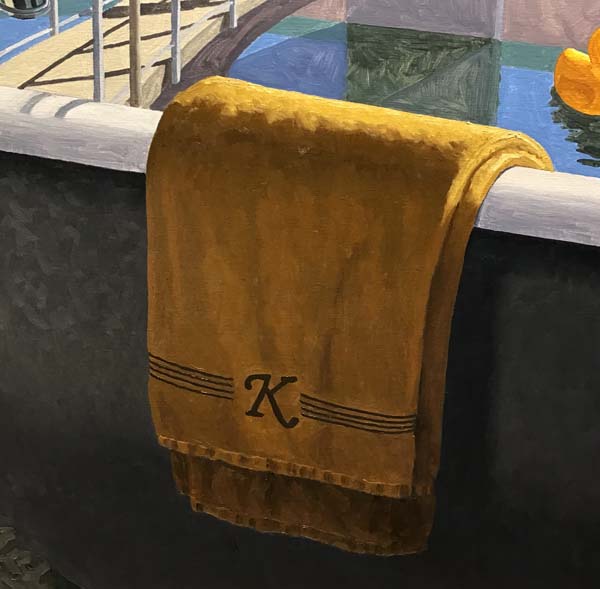
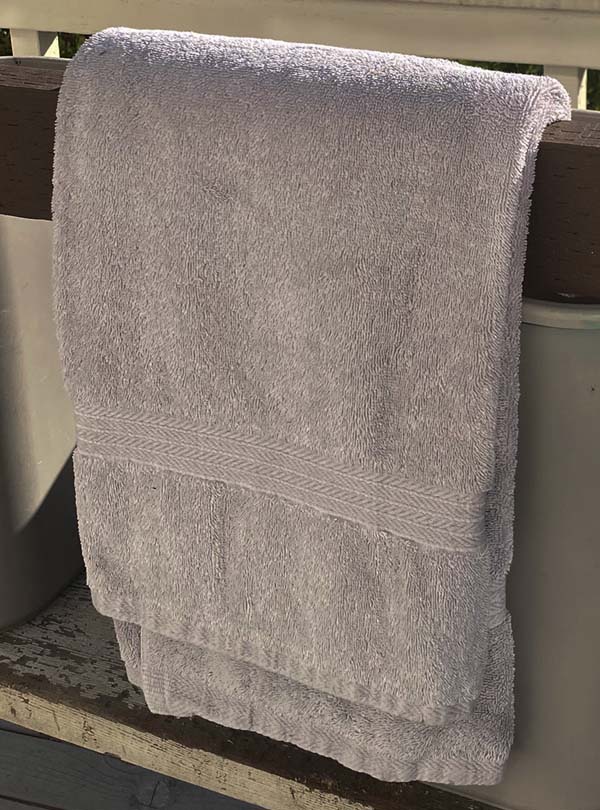
The towel was painted by mixing burnt umber, cadmium yellow, Permalba white and for the darkest areas, I added French ultramarine blue. 
All the street lights are finished. Now off to the bridge. 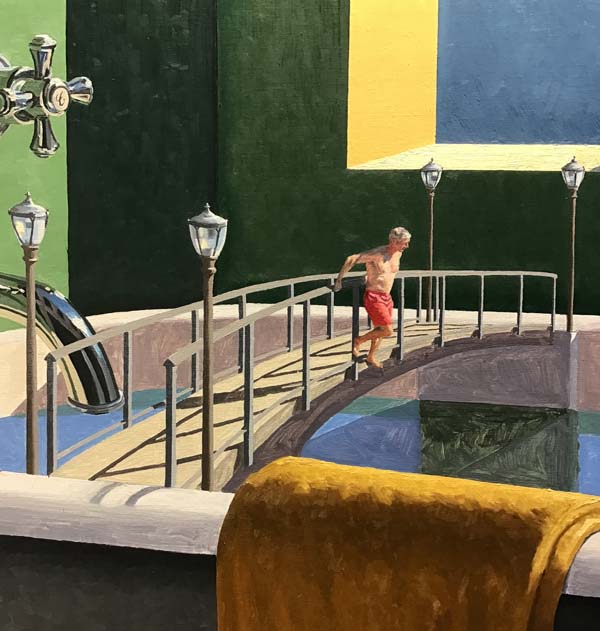
The street lights and the railing are done. I need to let them dry a few days before painting the bridge walkway. 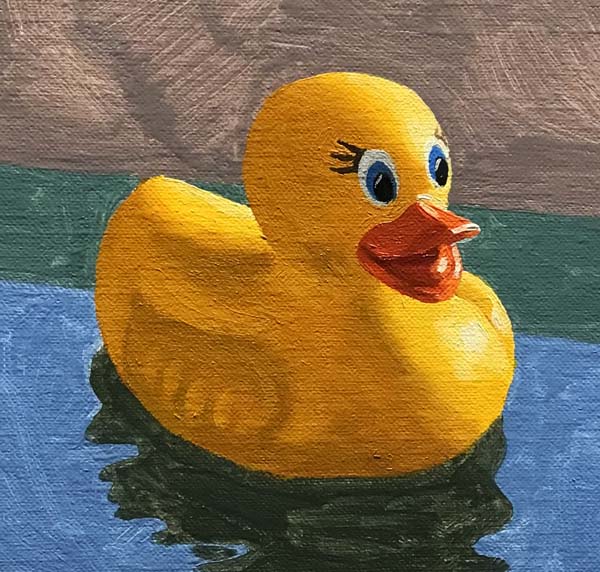 Mr. Duck is proud to have his final layer of oil. 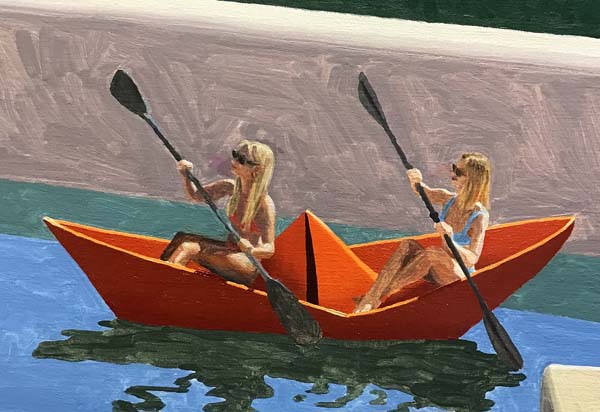 The origami boat has a new coat of paint, making it sea worthy. 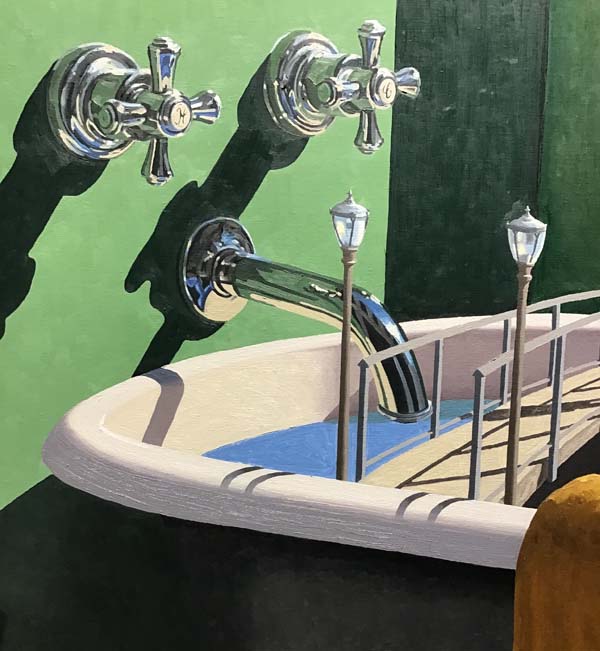 I've just finished painting the bathtub, both the top edge and the inside wall of the tub. There are a myriad of carefully chosen values with very specific hues to portray the warm and cool shadows and curves of the tub. Painting in and around the bridge and objects in the tub and maintaining the soft transitions between light and shadow was very delicate. 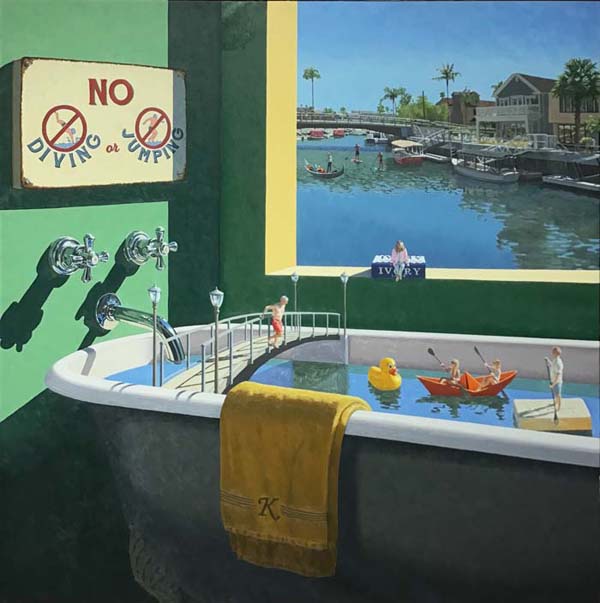
Here's a look at the whole canvas. A little more work on the bridge, the bar of floating soap, and I'll be ready to finish the 5 family members. 
The Ivory soap is completed. 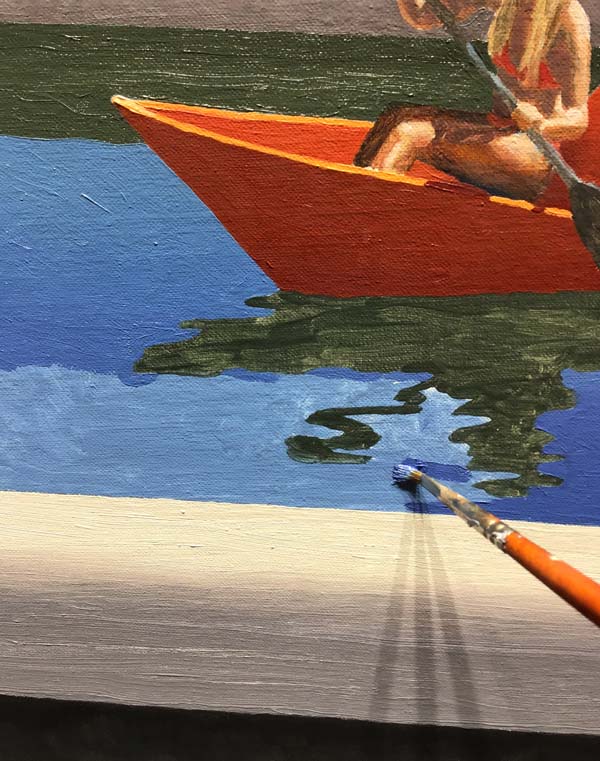
I'm painting the water in the tub, starting with a lighter blue at the top of the water and blending to a deep dark blue for the bottom area of the water. This will give some depth to the inside of the tub and make some of the highlight areas light up. If you look at the paint coming off my brush in the photo above, you'll see that there is a very distinct difference between the value of the first and second application of paint. 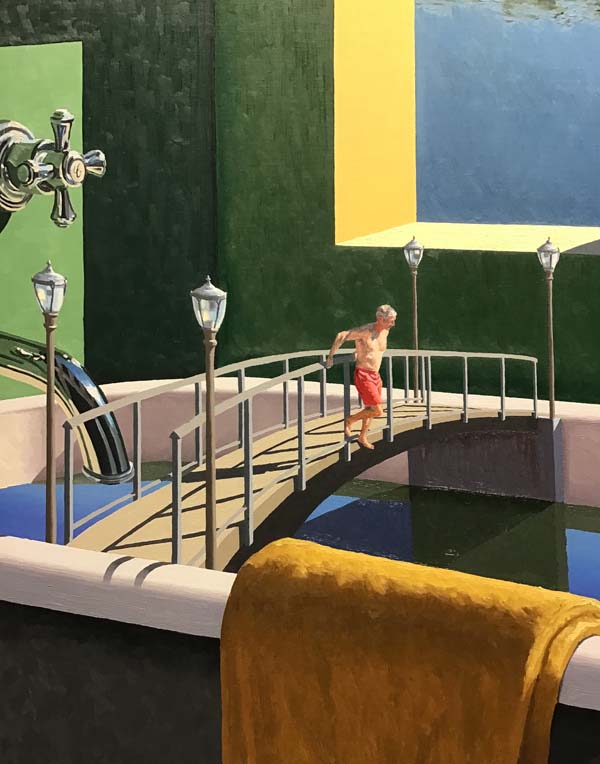 In this photo, the bridge is completely done. As I was painting the blue water, I also painted the various greenish reflections from the bridge and the inside of the tub. 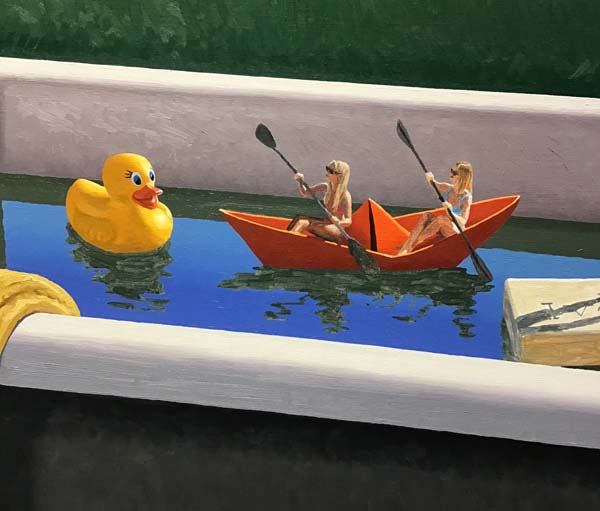
This sectional photo shows the transition of lighter to darker blue water, reflecting the sky above. 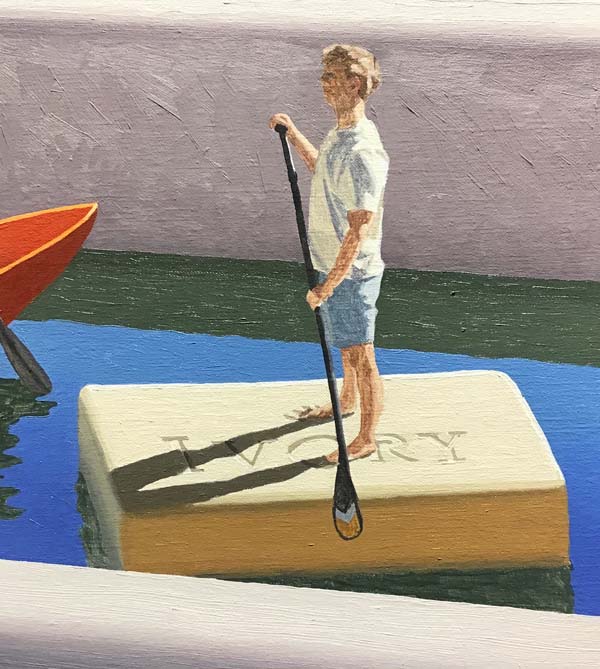
The bar of Ivory soap is painted and floating perfectly! A few more reflections to be painted and then I'm on the home stretch with rendering the 5 figures. 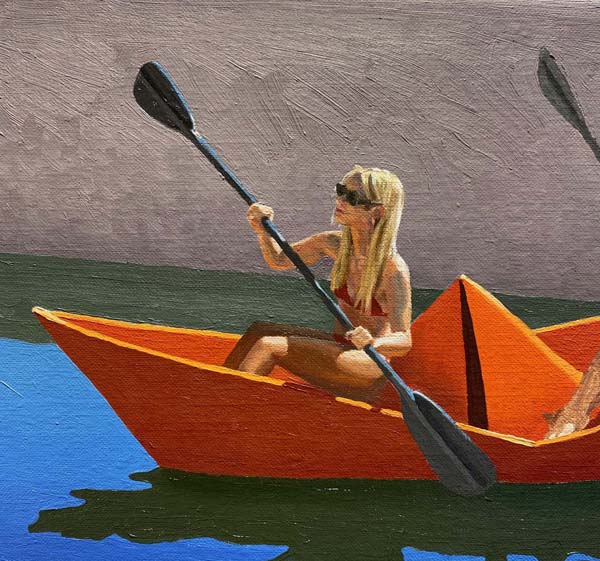
Fiona is finished. There are many small mixtures of flesh tones, some with cool grays to reflect the sky that affects the coloration. 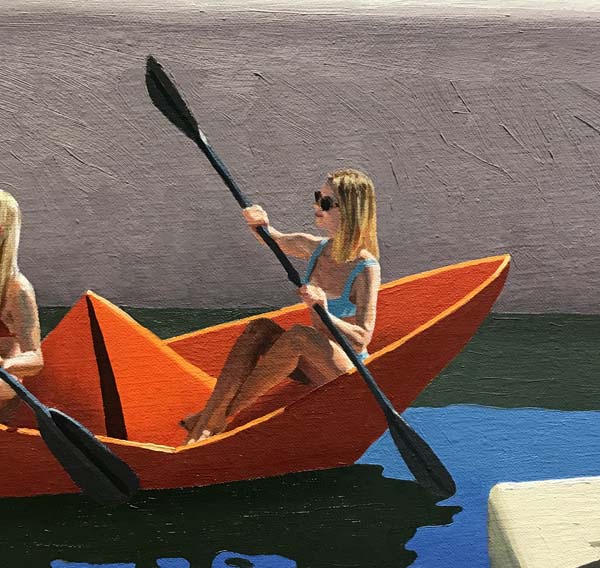
Now Allison is completed. On the website, it is hard to tell how large or small the objects are that I am painting. The figures are small and require a very steady hand to assure that the details are correct. 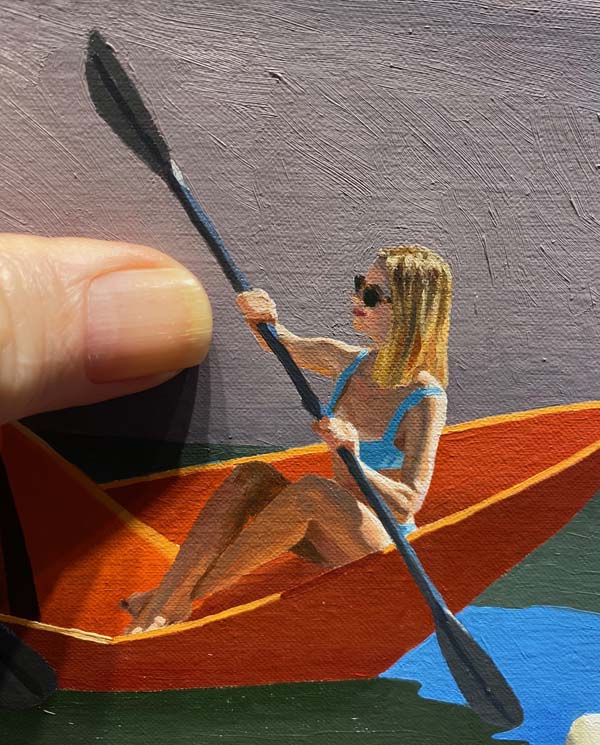
Here's my thumb on the canvas. You can see that Allison's head is about half the size of my thumbnail. 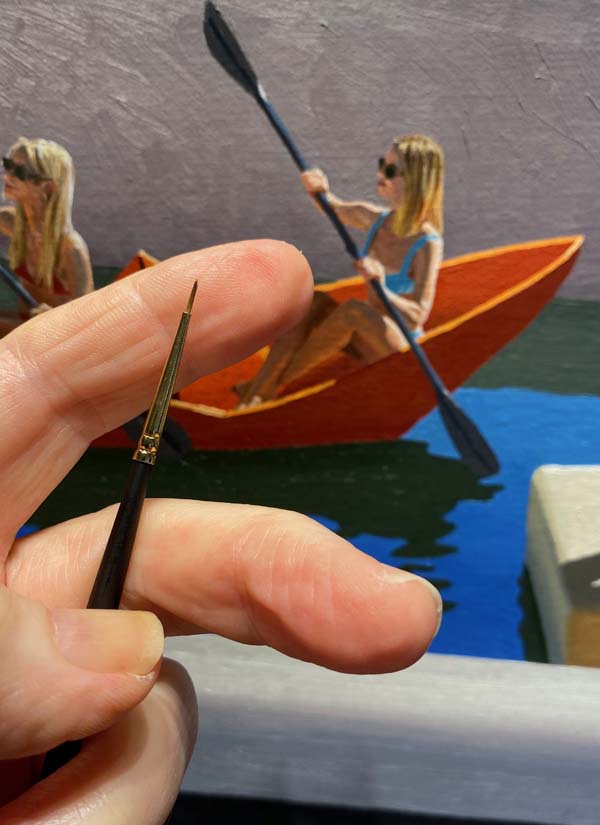
This is my little workhorse. A 'double 00' round sable. On a large painting like this one, I'll wear out a couple of these small tools. 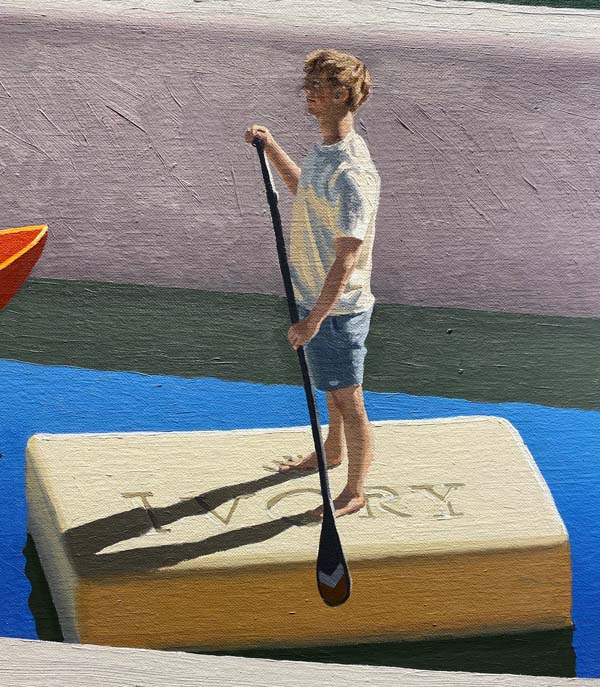
I just finished Kevin. All three of the kids turned out great! Now on to mom and pop. 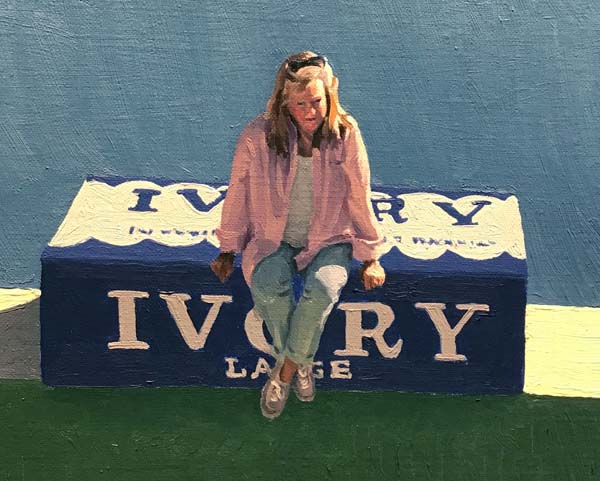
MaryBeth has just received her final layer of oil paint and that leaves just Steve. Since Steve's final paint is the most difficult of all the family, I've saved it for the last thing to be painted. 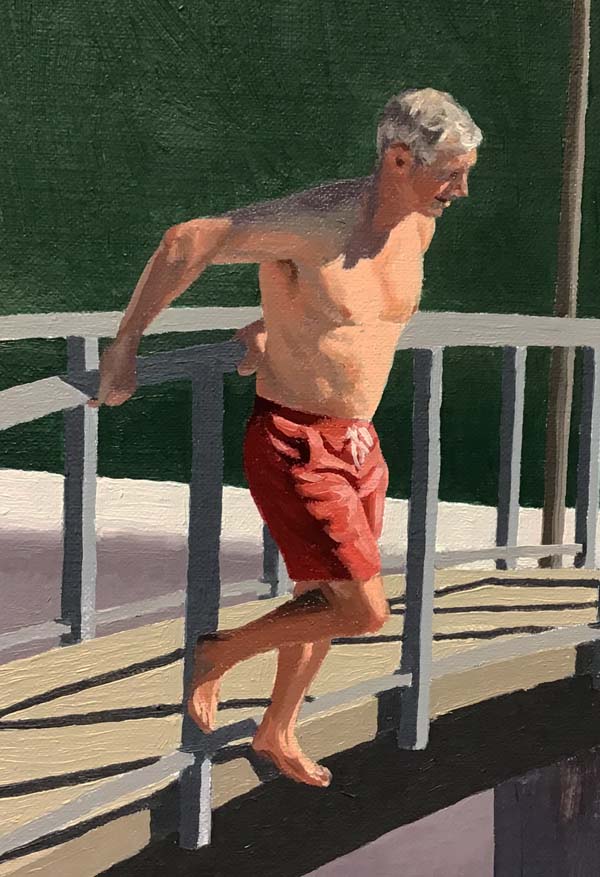 Steve requiered 12 separate mixtures of flesh tones and shaded area tones in order to get the correct modeling of his skin. The camera and Photoshop made the dark area on the back of his bent leg a little harsh looking online, but the actual rendering on the canvas is much softer. Steve was the last object to be painted on this four foot square canvas. 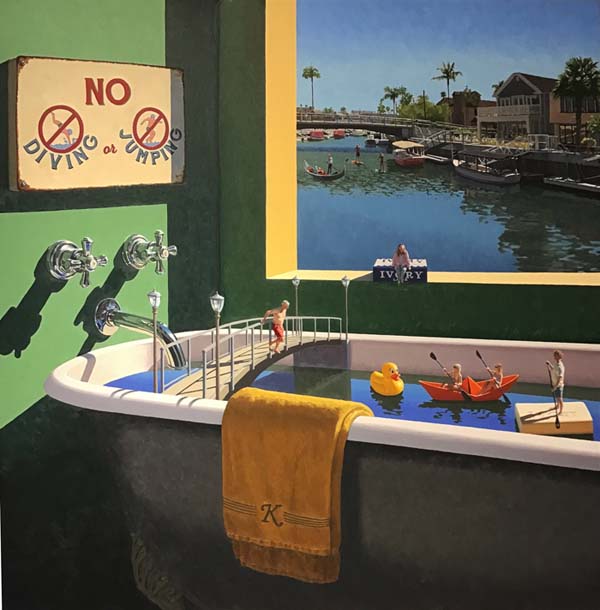
Here's the final product. This image took more step-by-steps than any previous painting of mine, showing all the intricate details involved in the design. It turned out great! I'll let it dry for a week and then give it a light coat of retouch varnish to bring out the rich darks that always dry a little light. |
|||
|
|
|||
email:scott@scottmooreart.com |